
How NOT to connect a well pump to an IBC tote
You'd think it'd be simple to get a water pump to pump water. Here are all the hiccups I went through.
My brother & his partner are up near Asheville, caught in the aftereffects of hurricane Helene. Most pressing for them is that Helene destroyed most of the city's water infrastructure, and it'll be weeks before even non-potable water starts flowing in most parts of the city.
They have access to an in-ground well with a limited water supply, but it's not near anything. So they're trucking water around in drums, siphoning it into buckets with a hose.
I brought them a used IBC tote I got off Facebook Marketplace, which are cheap and abundant in my area. 330 gallons of potable, food-grade water storage. I also brought a Drummond shallow-well water pump from my local Harbor Freight.
It took us five days of work to connect it to his home plumbing, because neither of us are plumbers, and the pump's installation instructions lied to us.
Here's the stuff we struggle-bussed our way through, so you don't have to.
(A) Put the check valve (only) on the intake side
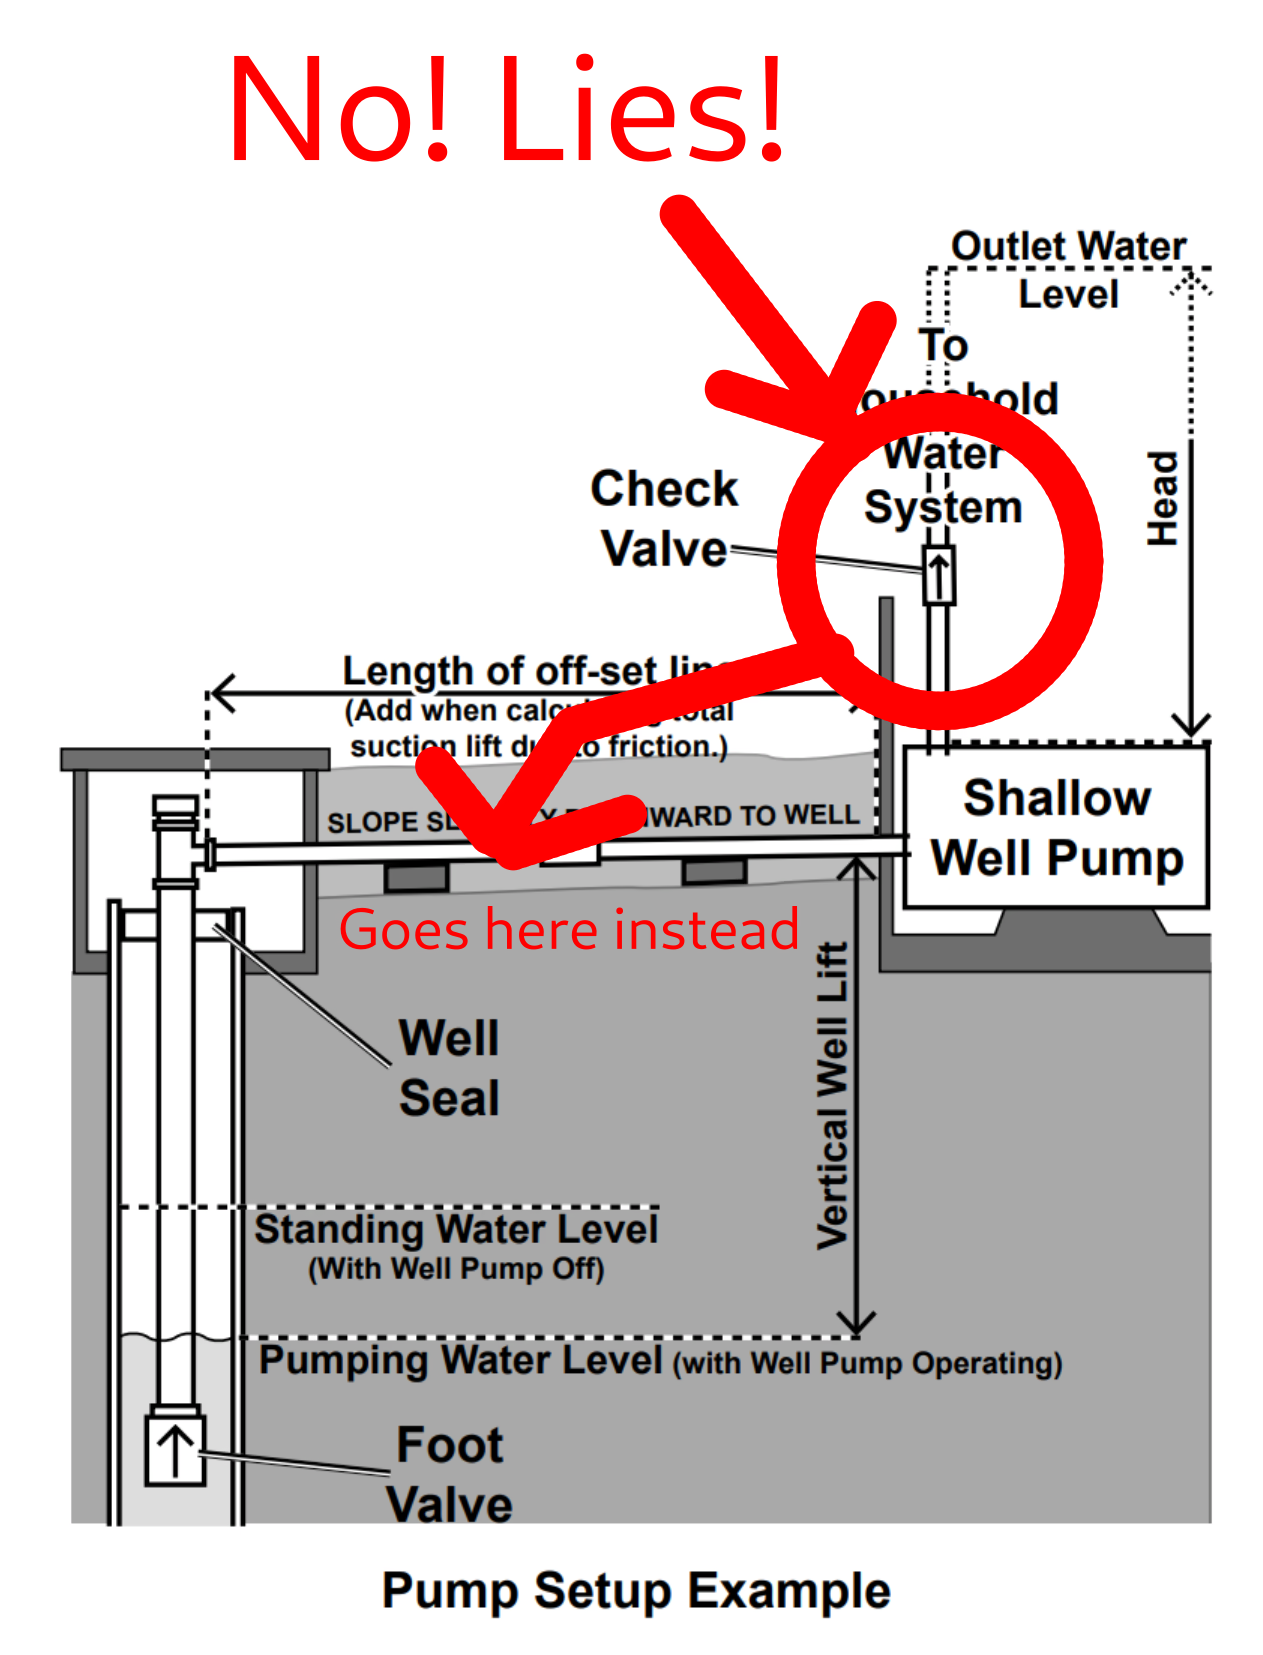
The pump's installation instructions showed a check valve (one-way water flow) installed in between the pump and the house
This is wrong! It will prevent the pump from knowing the downstream pressure, so it'll short-cycle (rapidly turn on and off).
You do need a check valve installed on the water intake line. Yes, even if you already have a foot valve! When the pump shuts off, the intake line depressurizes. That pulls water backwards through the pump, depressurizing the outlet, and the pump short-cycles trying futilely to repressurize the outlet line.
(B) The pump must be horizontal
The pump must be installed horizontally, not vertically. The instructions are ambiguous about this, only saying it must be "level". But yeah, horizontal.
(C) Keep the pump uphill of the water source
We didn't confirm this still mattered after we figured everything else out, but it's mentioned in the instructions, so give it some thought.
We initially had the pump in the basement, with the water intake hose running downhill from where the IBC tote was installed. This did not make the pump happy, possibly because the weight of the water in the line added unexpected water pressure to the pump.
Once we moved the pump above the IBC tote's elevation, things got better.
(D) Check your home's water pressure tank
We found out ours was blown, so the pump couldn't maintain pressure. We bought a new one, correctly sized for the home (the old one was was not), and set its empty pressure to 28psi (2psi below the pump's 30psi cut-on pressure).
This was critical, as it gave the home a place to store pressurized water, and thus gave the pump something to pressurize.
We thought the pump would just hold the water lines at pressure, but that never worked for us. Worth calling out: we tested shutting the valve between the pump and the house to isolate variables, but this was never going to work, because the isolated portion of the system didn't include a pressure tank. More short-cycling ensued.
If you bought the pump model with the built-in accumulator tank, this might not be an issue. But that's just a guess.
(E) Open your faucets
You'll get air in the system and the pump will struggle to reach & maintain pressure if you don't get that air out. Go run your faucets while the pump runs.
(F) Get the right size outlet hose
This particular pump takes a 1¼" outlet hose. The instructions don't mention the size. The plastic plug is labeled 1.2", but that's yet another lie. It's 1¼".
(G) Verify how far the water is being drawn
The pump can only pull water so far. It seems to be more forgiving of flat terrain than of pulling the water uphill, but still, keep the IBC tote and the pump near each other if you can.
(H) Keep that pump primed
When you keep disconnecting & reconnecting your hoses you can lose prime on the pump as it leaks water out. Re-prime it as appropriate.
(I) Use a non-compression hose
If you're using hoses for your water intake/outlet, be sure they're non-compression hoses. The pump will put a lot of suction and expansion pressure on the water lines, and an ordinary garden hose will shrink or expand accordingly. When the pump shuts off that pressure will go away and the hose will return to its normal size (changing its volume in the process), which changes the pressure in the hose, and the pump kicks on again.
The pump's correct behavior
If everything is working right, you should see the pump running smoothly while it reaches pressure. You can confirm it's pressurizing by attaching a tire pressure gauge to your water pressure tank.
Once the pump reaches pressure (50psi), it will gracefully shut off entirely, until you run enough water that pressure falls below 30psi. The pressure gauge will not read "zero", which we interpreted as the pump kicking in a safety cut-off after too much short-cycling.
When correctly installed, the pump will not short cycle, stutter, or run continuously.